We are excited to announce the release of Kasten K10 version 6.0, the latest and most advanced version of our industry-leading platform that provides enterprise-grade Kubernetes data protection and application mobility. This release helps customers scale their cloud native data protection efficiently. Kubernetes deployments are growing at an unprecedented rate. Gartner predicts that by 2027, more than 90% of global organizations will be running containerized applications in production. However, today’s market conditions are scarred with financial uncertainty and a shortage of cloud native skills. Therefore, you must ensure operational efficiencies are in place to unleash the full potential of your cloud native environments while protecting your data. Additionally, security remains an imperative as organizations focus on keeping their businesses running. With this release, we also continue to innovate in this growing ecosystem, so that you can take advantage of the best-of-breed inn...
Get link
Facebook
X
Pinterest
Email
Other Apps
Veeam Backup for Salesforce – Integrating With Azure Active Directory for RBAC
Get link
Facebook
X
Pinterest
Email
Other Apps
CONGRATULATIONS! You have successfully installed Veeam Backup for Salesforce, and you are ready to provide access to your backup and / or Salesforce teams. But how do I accomplish this? Where do I start? What steps must I take to enable Role Based Access Control (RBAC)? How can I leverage my users and groups in Azure Active Directory? The good news is that Veeam Backup for Salesforce makes it incredibly easy, and only takes a few steps.
Let’s jump into it!
After the installation completes, a URL will be provided to perform the initial configuration – for example:
If you copy the URL into a supported browser, you can perform the initial configuration. One step of the initial configuration will be to create a local administrator account:
Important: the username can be anything. The username of “admin” was used in the screenshot but is not specifically required.
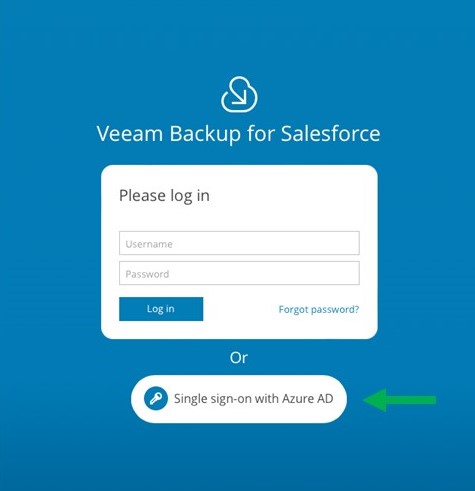
Once the local administrator is created and the rest of the configuration is completed, you will receive the following login prompt:
One item I would like to highlight is that no link calls out “Single Sign-on with Azure AD.” This is how you know that Azure Active Directory integration is not yet configured.
At this point, the only login credentials available will be the local administrator previously configured as part of the initial configuration. The local administrator can perform all operations in the Veeam Backup for Salesforce console. These include, but are not limited to:
Establish configuration settings
Create backup policies
Monitor backup jobs
Perform recoveries
But managing Veeam Backup for Salesforce using a single account is not practical. This would mean multiple users accessing the management server using the same account. This brings up a whole host of challenges:
Inability to determine which user performs which action.
Inability to restrict access to certain actions / functions for specific users.
The solution, Veeam Backup for Salesforce integrates with Azure Active Directory so you can include pre-existing users and/or groups. In addition, these users and groups can be assigned specific roles to define what actions they can perform. This is known as “Role Based Access Control” (RBAC).
There are four roles that you can assign to user and groups working with Veeam Backup for Salesforce:
Role name
definition
Administrator
Can perform all configuration actions and backup and restore operations. This role gives a user access to all companies and all Salesforce organizations added to Veeam Backup for Salesforce.
Backup Operator
Can create and manage backup policies, manage the protected data and perform all restore operations. You can limit access to companies and Salesforce organizations for users when assigning this role.
Restore Operator
Can only perform restore operations. You can limit access to companies and Salesforce organizations for users when assigning this role.
Viewer
Can monitor backup and restore processes without performing any operations. You can limit access to companies and Salesforce organizations for users when assigning this role.
No Access
Explicitly prevents specific user(s) / group(s) from managing Veeam Backup for Salesforce
Now the question is, how do you configure Veeam Backup for Salesforce to leverage Azure Activity Directory and RBAC? It is simple and here are the steps you perform:
Login to the Veeam Backup for Salesforce management console with the local administrator account configured as part of the initial setup.
Perform the following steps:
Select “Configuration” in the upper right corner
Select “Users and Roles”
Select “Single Sign-on”
Set the “Enable Azure AD Authentication” to “On”
3. Log in to the Azure portal and launch Azure Active Directory:
4. Create an app registration:
Select “New Registration” and you will provide the following information:
The name of the app registration
Select the “Supported Account Types”
Configure the Redirect URI
Type = Web
The URL can be found in the Veeam Backup for Salesforce configuration as the “Callback URL”
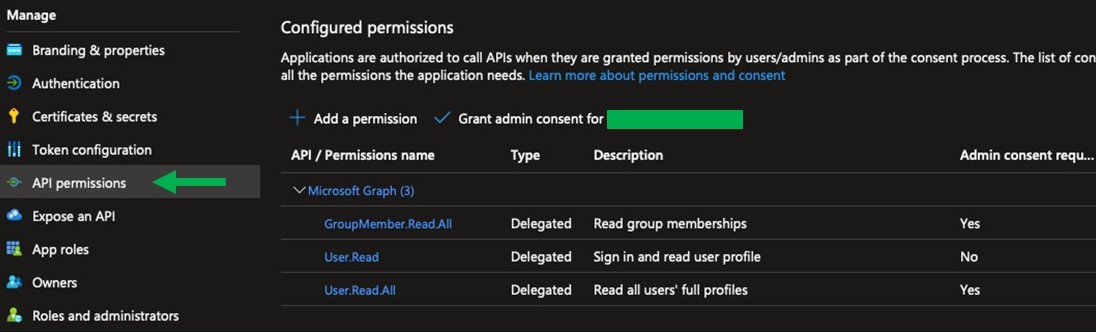
5. Perform the following steps to assign Microsoft Graph API permissions to the app registration:
At this point, you will be able to search / select the following permissions
GroupMember.Read.All
User.Read
User.Read.All
For example:
One additional / important note, for the GroupMember.Read.All and User.Read.All permissions, you will need to “Grant admin consent” for these permissions. Simply click the “Grant admin consent for <Azure Tenant>”.
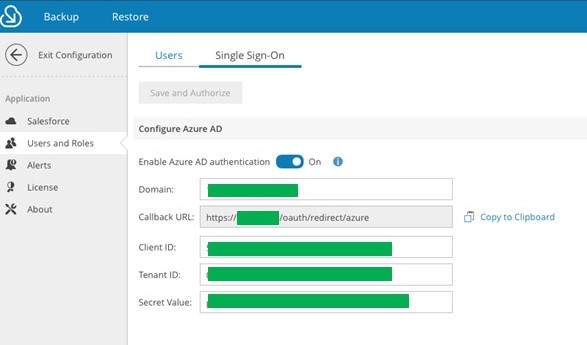
6. Once the app registration is created and the appropriate permissions are assigned, you will need to update the Azure AD authentication information in the Veeam Backup for Salesforce console:
The following fields will need to be updated:
Field Name
Field value and where to find
Domain
The IP address, hostname, or fully qualified domain name that you will be accessing the Veeam Backup for Salesforce console with.
Callback URL
Auto-generated based on the domain information inputted
Client ID
The Application (client) ID of the registered Azure AD application.
Tenant ID
The Directory (tenant) ID of the registered Azure AD application. Can be found in the “Properties” pane in Azure Active Directory.
Secret Value
A secret string that the application uses to prove its identity when requesting a token. Also can be referred to as application password. Can be found and generated in “Certificates & Secrets” / “Client secrets” for the app registration created.
7. Once all the information is inputted, you can save and authenticate:
You are now ready to add users / user groups and assign roles!
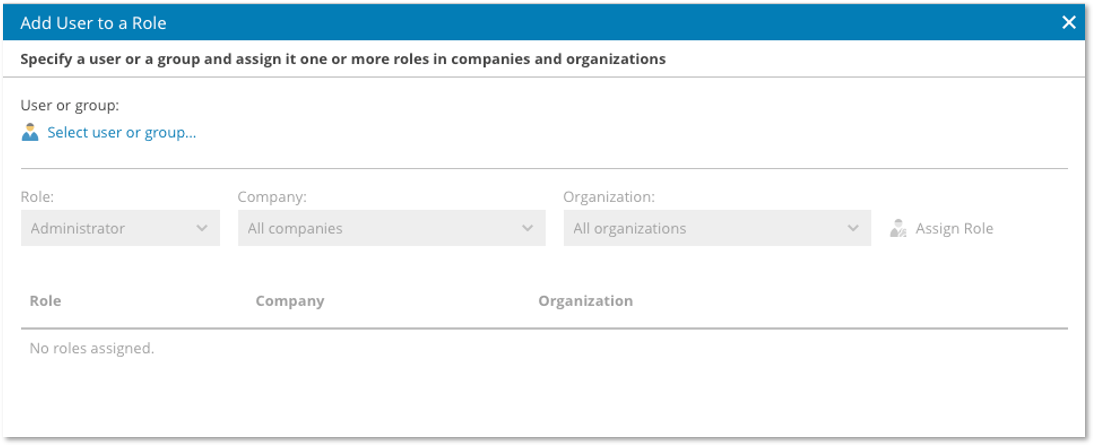
8. Within the Veeam Backup for Salesforce management console:
Select “Configuration” in the upper right corner
Select “Users and Roles”
Select “Add User”
Select “Select user or group”
Select the applicable user or group
Select the applicable:
Role
Company
Organization
Select “Assign Role”
Now you are fully configured and ready to log in and manage Veeam Backup for Salesforce with your Azure AD credentials.
To verify that all is configured successfully, log out of the Veeam Backup for Salesforce console, and when the login prompt is once again displayed, it should now look like this:
It is as simple as that! Just follow the above steps outlined above, and you will be able to integrate and leverage Azure Active Directory in your Veeam Backup for Salesforce deployment.
In this second part (the first part can be found here ) of setting up and hardening a Veeam “hardened repository,” I will cover how to set up Ubuntu 20.04 in a secure way. While it’s “just a minimal installation,” I have seen many questions on this topic, so let’s clear some things up. Before we start, let’s recap the requirements: A RAID 1 for the operating system on SSDs with at least 100 GB disk space A RAID 6/60 for the backup data Static IP address, gateway and DNS settings Recommended: redundant network connection Switchport: untagged UEFI Secure Boot is enabled With all environmental preparations done, we can now download Ubuntu 20.04. Download Download the latest Ubuntu 20.04 ISO from the Ubuntu website. At the time of this writing, that was the ubuntu-20.04.5-live-server-amd64.iso. The latest ISO ensures that the Linux kernel is as new as possible to support newer hardware. Technically you can also use Ubuntu 22.04, but there are currently no DISA STIGs (Securit...
As Kubernetes applications grow in number and scale in diverse deployment environments, organizations face a shortage of skilled personnel whether it be DevOps or Platform Ops to ensure that critical data management functions like backup, disaster recovery (DR), and application mobility are in place. In other words, organizations need to not only transition to a new, modern cloud-native development technology and workflow, but they require operations at scale without having an army of certified Kubernetes administrators. This is where Kasten K10 shines by scaling simplicity. Grab a cup of coffee, and let’s take a short tour of the new capabilities introduced in Kasten K10 V5.5 and how they can benefit you. With this release, Kasten by Veeam scales simplicity of operations to bridge the Kubernetes skills gap with powerful capabilities, including autonomous operations and cloud-native expansion. Autonomous operations with Kasten K10 V5.5 Augmenting an organization’s workforce so th...
For those of us who have been in the business of backing up data for a while, we’re used to making copies of data on different types of media. I won’t date myself by mentioning reel-to-reel tapes, but the journey started with tape and then backing up data to block/file-based disk storage came along. More recently, a new kid on the block has become a popular destination for backed up data, object storage. Veeam started to use object storage as a target when we released Veeam Backup & Replication 9.5 Update 4 in January 2019 by introducing our use of AWS S3 compliant object storage via the Capacity Tier. A year later, we launched Veeam Backup & Replication v10 which featured support for object locking to provide data immutability for object storage. Immutability provides protection from ransomware attacks by locking the objects which prevents them from being modified or deleted by malicious software or humans. Today, Veeam Backup & Replication is protecting hundreds of petab...


Comments
Post a Comment